by Christine | Cooking, Writing
Food & Wine Magazine did it again. They totally seduced me. I mean, I love to make fun of how out of touch they are with the “little folk” who don’t have $80 to plunk down on a wine. And the recipes? Don’t get me started. Half of them require ingredients that you need to crawl up a Himalayan mountain and see the guy in the second yurt on the left in order to find them. Or hit up six specialty stores, depending on your neighborhood.
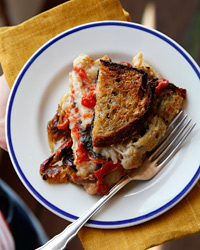
But every now and then, they’ll showcase a recipe that looks easy. Panade? Well, maybe not. BUT – call it a Tomato, Chard and Gruyere Casserole, and you’ve hooked me. How easy can that be?
Six hours after I started shopping for ingredients, the darn thing is in the oven. (Okay, so I went along the untrodden pathways to find the freshest tomatoes at little roadside stands. So it took awhile. Cutting up the chard? That took forever!) Unfortunately, the first roadside stand is where I bought my tomatoes. It was also the biggest roadside stand, the most commercial stand, and the most expensive stand. It is not a place I will go to again.
But the ingredients, by themselves, weren’t expensive, except for the gruyere cheese. $21 a pound! I bought just under half a pound, since I knew I had some in the fridge – but still, $8.50 for a tiny sliver of CHEESE? I’m thinking, the next time I’ll make it with swiss cheese, and whatever else I may happen to have in the fridge.
So you butter a casserole, layer in the day old peasant bread (which I cut the minute we got home and let just sit out), then layer in thickly-cut fresh tomatoes, then the cooked chard/onion mix (oh, go ahead and look it up – you KNOW you want to!), plus the aforementioned gruyere. Repeat, and end with the last of the bread. Then you do some magic to it (get the recipe!) and put it in the oven. For an hour. And a bit.

See? It’s a sandwich. Sigh.
When I showed the photo of the casserole to my oldest son, he said to me, “Oh. A sandwich.”
I felt like such an idiot. Because duh, this is exactly that. A sandwich. True, a hot sandwich with no meat in it and a nifty sense of France, but still…a sandwich. With expensive and yummy cheese in it.
Seduced again by Food & Wine. (Recipe, page 100 of the August 2012 Food & Wine Magazine)
What are you cooking this week?
~ ~ ~
Hey, all month I’m over at The Romance Reviews for their Sizzling Summer Event! http://www.theromancereviews.com/event.php
Lots of contests and freebies and Author Chats – I’m there Saturday, July 14th. Drop on by and say “hey” !
by Christine | Cooking, Life, Wine Friday
The news lately is depressing. Red meat kills you faster than anyone had thought (Los Angeles Times, Tuesday, March 13, 2012). You’re not supposed to drink coffee prior to donating blood, as coffee lowers your iron count. (This is new!)
According to heart surgeon Dr. Dwight Lundell, our years of eating highly processed carbohydrates and the excess consumption of omega 6 vegetable oils such as soybean, corn, and sunflower oil is the #1 major cause of heart disease, and not cholesterol (Sott.net, March 1, 2012). Here’s a quote from the Sott article: “Simply stated, without inflammation being present in the body, there is no way that cholesterol would accumulate in the wall of the blood vessel and cause heart disease and strokes. Without inflammation, cholesterol would move freely throughout the body as nature intended. It is inflammation that causes cholesterol to become trapped. ” It’s a fascinating article, and I highly recommend you read all of it.
PANIC TIME All this news, though, has caused me to panic in the kitchen. I enjoy making bread, and feeding steak and smashed potatoes to my boys. But at the same time, I want my family to stay healthy. What’s an omnivore who has no interest in changing her stripes to do?
I reached for a bottle of wine, natch!
 Starborough Sauvignon Blanc 2011 Marlborough, New Zealand Alcohol 13% by volume. Regularly $12.84 at Vons; on 30% off special for $8.99. (DON’T get me started on that phony $12.84 pricing.)
On the Label: “New Zealand’s South Island is home to the Marlborough wine growing region, known for its natural beauty and some of the world’s finest Sauvignon Blanc. Marlborough’s favourable climate and diverse geography develop wines with a unique character, making them as flavourful as they are refreshing.
“Our Sauvignon Blanc delivers all of the refreshing citrus aromas and lively acidity that characterizes the Marlborough region. Our goal is to take the Starborough experience even further; with a layered testure and long, crisp finish that truly epitomizes the character of New Zealand itself.”
My Take: I liked this wine a lot. I’d come home from work and was in a bit of a panic about dinner; found a healthy recipe and scooted off to the store. Found this wine – and felt my panic recede a bit. The wine was crisp, clean, and yet had a hint of sweetness. Refreshing and very easy to drink. After my first sip, I felt panic slip away and I began to cook.
My Rating: ~ Very Drinkable ~ I think I may just start buying NZ Sauvignon Blancs when I’m in an S. Blancish mood.
Recipe: Grilled Stuffed Portobello Mushrooms via MyRecipes.com
This recipe is one of my favorites – I didn’t list it here, because I didn’t create it, but do  check it out. Grilled mushrooms, chopped tomato, garlic, rosemary, lemon juice, olive oil and mozzarella cheese – what’s not to love?
Ahhh…I was sipping wine though, remember. And I was a bit panicked about life and eating. So where the recipe called for 2/3 cup of chopped tomato, I tossed in three chopped tomatoes. And where the recipe called for 1/4 cup of shredded mozzarella, I threw in a pound. (Oh, a handful at a time – but by the time I was done, the whole 16 oz bag had gone in. Whoops!)
The only bad thing was, I had made enough filling for twelve portobellos, instead of four. Sigh. If any of us had remembered to put up the extra, it would have made terrific topping for pizza! I did follow the rest of the recipe to the letter – grilling, basting, filling, and melting – and the mushrooms turned out spectacular (by far my favorite way to have them).
I paired this with a lovely chopped salad of bell pepper, zucchini, cucumber, spring onions, feta, three different types of lettuce (butter, red, and some crinkly artisanal lettuce), fresh basil, fresh parsley, and shredded carrot; squeezed one Meyer lemon over it all and added a splash of olive oil, salt and pepper, and mixed the heck out of it all. Tasted wonderful (and there were leftovers for lunch the next day).
On to the next bottle! After a full day of gardening, I came inside and opened another NZ bottle of wine…

thanks to http://www.wine.com
Oyster Bay Sauvignon Blanc 2011 Marlborough, New Zealand Alcohol 13% by Volume – on sale for $8.99 at Vons
On the Label: “Oyster Bay captures the special character of New Zealand’s cool climate viticulture…elegant, assertive wines with glorious fruit flavors.”
My Take: Nice and brief label – love it. I enjoyed this wine, too…it had a slightly more acidic flavor to it, which held up beautifully when paired with a robust chicken/mushroom soup I made and doctored the family with this past week.
My Rating: ~ Very Drinkable ~ Honestly, I was very pleased with the quality of both these wines. I will go out of my way to search for more New Zealand wines – hopefully I can find some yummy reds, too!
Well, that’s it for this week. Do you have any recommendations for wine under $10? I’m always looking for new ones to try! Remember the ratings are based on my taste buds (and sometimes those of my hubby), and will be influenced by how much the media has managed to panic me that week, how much gardening I’ve done, and the phase of the moon. Your taste buds will be different.
Thanks for dropping by – and remember to Drink Responsibly!

by Christine | Cooking
On the surface of things, Smashed Potatoes and Decadent Hot Chocolate don’t seem to have much in common. But if you delve a little deeper, you’ll find the connection.
Both mashed potatoes and hot chocolate can be made via the instant, just-add-water type. Which isn’t bad if, say, you’re camping. They can both be quite tasty, depending.
But when made from scratch, when you put the time in, so to speak, you come out with something indescribably delicious. A crispy, buttery-fluffy potato, and a rich, dark chocolate drink that is akin to what they must serve in Heaven. (Or at least in some nifty Paris bistros!)
SMASHED POTATOES
If you need a side dish that is a step above ordinary, this is it. Hearty, filling, and a taste

Yukon Gold Potatoes
treat, it all starts, of course, with the potato itself. I use fresh, hard, baby yellow potatoes, or baby reds if I’m in that mood. They both work. Slightly bigger than the baby potatoes work as well; you just need to cut them a bit smaller. I’ve never used russets or baking potatoes for this; I assume if you peel them and chop them into similar-sized chunks, they’d work fine.
Ingredients: Baby potatoes, butter, sea salt (or Kosher salt)
Kitchen ware needed: One sauce pan, one baking pan with sides (either a jelly roll pan or a 9 x 13 pan), and one slightly smaller pan of the same type (or a cast iron skillet).
Heat the oven to 425 degrees. Scrub the potatoes well. If they are true babies, cut them in half. If they’re a little bigger, cut them in quarters. Your goal is to get them all about the same size so they cook evenly. Put them in the saucepan, fill with water, and boil until they are fork-tender about 10 – 15 minutes. Drain.
Put potatoes, still steaming, into the jelly roll pan. Crowd them together in the center of the pan, as much as possible, so they’re all touching. Take your slightly smaller pan (or your cast iron pan – anything heavy that you can put your hands into) and make sure the bottom of the pan is clean – you might even want to lightly spray it with cooking spray. Set the second pan on top of the first pan (I put the pan with the potatoes on the floor) and, with all your weight, press down on the second pan so it “smashes” the potatoes to about half to 3/4 of an inch thick. Spread butter on top of the potatoes; sprinkle with sea salt or Kosher salt. Put in oven for 20-25 minutes. If your potatoes are done before the rest of the meal is done, just turn off the oven and keep the door closed. The potatoes will crisp more while you finish up.
Is this calorie-free? No. More butter makes it taste better. But it’s a fabulous side dish that you can wow your friends with. To make it fancier, sprinkle some freshly chopped parsley on top. Serve directly from the oven to your guest’s plates. They will thank you for it.

thanks to dancingbranflakes.blogspot.com for the photo!
Decadent Hot Chocolate
Perfect for the Holidays, or any day where it’s chilly outside, the powdered stuff will get you by. It’ll do in a pinch. But when you want to see how it feels to be Royalty, have your kitchen slave whip you up some of this bundle of delicious goodness, and you’ll feel your holiday stress melt away.
Ingredients: 1 cup high quality 60% cacao chocolate (I use Ghiradelli – but regular choc chips are fine) 4 cups milk, 3 Tlb powdered baking cocoa, 3 Tlb white sugar, 1 cup heavy whipping cream.
Put chocolate in a pan, and add just enough milk from your 4 cups to float the chips a bit. Heat until chocolate is melted through, stirring the entire time. Once melted, add the rest of the milk a little at a time, keeping the heat on medium (don’t boil!). Then add the powdered cocoa, one Tlb at a time, whisking it in. Do the same with the white sugar. Once that is incorporated, slowly add the 1 cup heavy whipping cream, stirring the entire time. Continue to stir until the chocolate is hot again. Then drink and be glad you are human!
This goes beyond mere hot chocolate. This will put you into Holiday Nirvana. Turn the Christmas lights on, put the carols on, and get the wrapping paper out – no chore is too much to handle when you’ve got a cup of Decadent Hot Chocolate by your side!
Again, not calorie-free. But sometimes, during the crazed holiday season, we need to treat ourselves. It is seriously rich – maybe start with a small espresso-sized cup. It also is a fabulous addition to coffee – say, half chocolate and half coffee. It also goes really well with cinnamon cookies that my hubby made – pure heaven! (But that’s another post!)
I hope you enjoy. To see the original post, and how we came to steal this recipe, please hop here…
Coming up: This Friday, I talk about affordable wines. More reds – three really good ones, and a chameleon wine…see you then!
Demon Soul is available for the Kindle and the Nook, as well as in paperback! It makes a great Christmas present, lol!

by Christine | Cooking, Life
Yay! The bone doc showed me the white line across my fibula – the bone is healed! So after a five month relationship, I’ve said my goodbyes to the ortho office, and hello to my new best friend, Jane Fonda.
Some of us remember the 1980s, when she spearheaded the in-home aerobics fitness craze with VHS tapes of exercise classes. I confess, I didn’t buy any then because I had a gym through my place of work that I didn’t have to pay for, which included aerobics classes. (I took my first real aerobics class after a couple cocktails…but that’s another post.)
 So the hubby and I were in some fitness store or other – he was looking for tennis tape to wrap his juggling pins with – and I stumbled upon this DVD by Jane called “Fit and Strong”. It came out in 2010; Jane was in her early 70s when she made it. I LOVE this video. It uses a chair, and easy weights, and a towel; it takes 20 minutes to do. It will make me strong enough (and already has in some ways) so that I can get back to more vigorous exercises, once I can do these without being sore the next day. So I guess it’s an old-person’s exercise program. No, wait – it’s an out-of-shape, creaky-person’s exercise program! Because there’s no way that I’m old. (LOOK at that photo! Doesn’t she look fabulous?!!)
Jane is extremely appealing in the video. She’s someone I would love to sit and have a cup of coffee with – or three or four. Someone I’d love to chat with. As it is, I pant and balance and grin along with her as she talks about getting strong in your seventies, and how she has a titanium and plastic knee and a titanium and ceramic hip. Jane is my new best friend. She’s going to help me get back to ME again.
Which will be good, as I deal with the Thanksgiving Leftovers. (This year, since we went down to my nephew’s home for the Holiday, I only made a turkey for the leftovers!!!) I usually make turkey stock with the carcass and skin, an onion cut in half, two carrots and two celery sticks and a whole bunch o’ water in a big soup pot, oh and a couple tablespoons of white vinegar to help leach out the marrow from the bones. Boil the hell out of the whole mess over two or three days, skimming as you go, until the liquid is reduced by about half. Then strain the whole thing, toss out the skin/bones/vegetables, strain again – and you’ve got healthy, fresh stock, which can be used in a million different ways.
The meat gets one of two different treatments (not, obviously, counting turkey sandwiches – that’s a whole ‘nother post!). When I gave the boys in my family a choice between yummy turkey enchiladas and turkey pot pie, my two sons both chose pot pie while my husband just grinned and nodded for both choices. This time around, though, I believe I have enough turkey meat to handle the pot pie AND the enchiladas, so that’s kind of exciting.
TURKEY ENCHILADAS based on a recipe by Ron Stell (I don’t have the recipe in front of me, so…) These are NOT your red-sauce enchiladas!
Ingredients: 1 can cream of chicken soup; 1 small can chopped mild green chilies; 8 ounces sour cream; 12 ounces pepper jack cheese, shredded/divided; 3/4 cup chicken or turkey stock; six scallions (green onions), chopped; 8 – 12 medium sized flour tortillas and 2 – 3 cups shredded turkey (or chicken).
Directions: Preheat oven to 325 f. In a 9×12 pan, spray with cooking spray; set aside. In a large bowl, add cream of chicken soup, green chilis, sour cream, 8 ounces of the pepper jack, the stock, and the green onions; mix well to combine. SET ASIDE 1/3 OF THIS MIXTURE FOR THE TOP. (Can you tell I always forget this part?) Add the chopped chicken/turkey to the mixture.
Take a tortilla, put a couple tablespoons of filling in, and roll up. Place in prepared pan. This will make about 10 enchiladas, unless you’re generous, in which you’ll make 8. Once all the tortillas are nestled in the pan, spread the reserved sauce over the top and sprinkle with the reserved cheese. Bake at 325 for 20 – 30 minutes, or until bubbly and just turning light brown.
This recipe doubles or even triples easily, so you can feed a crowd. It also freezes beautifully (especially if you have a freezer big enough to accommodate the pan). If you want to spice it up, feel free; but my Ohio boy likes the spice kick in this just fine.
Turkey Pot Pie
Use whatever crust recipe that you have that you love. Or buy those lovely pre-made pie crusts in a box. For a real easy pot pie topper, use a sheet of puff pastry – and forego the bottom crust (which I do all the time). For this recipe, we’re using the puff pastry.
Ingredients: 1 sheet puff pastry, thawed; 2 cups chopped or shredded turkey; 1 Tlb olive oil; 1 small chopped onion; 2 sliced carrots; 1 sliced parsnip; 2 sliced celery sticks; 1 cup frozen green peas, thawed; 3 Tablespoons butter; 3 Tablespoons flour; 1 cup chicken or turkey stock; 1 cup 2% milk (or lower); 1-2 Tablespoons dry Sherry thyme, salt and pepper to taste
Directions: Preheat oven to 325 f. Heat a saute pan over medium heat; add olive oil. When oil is hot, add in onions, carrots, parsnip, and celery; saute until softened. Sprinkle with a bit of dried thyme about half way through. Once the vegetables are done, add in the green peas and one tablespoon of the sherry. Saute until the liquid is gone, remove from heat and add the turkey to the vegetables; mix well.
To make the sauce: in a medium saucepan, heat the butter until melted but not burning. Add in the flour to make a roux; stir until the mixture has a golden color, then add the one cup chicken stock, stirring rapidly until combined. Add in the milk and stir until thickened. Taste the sauce; add up to one teaspoon each of salt and pepper. Add in one to two tablespoons sherry to the sauce; feel free to sprinkle some more thyme. Once you are satisfied at the taste, mix the sauce in with the turkey and vegetables. Pour into a deep dish pie plate. If you only have a shallow pie plate, keep the rest for a yummy open turkey melt sandwich.
Now to the puff pastry. Working quickly, roll out the puff pastry until just big enough to cover the top of the pie pan. Drape the pastry over the top; use a knife and cut around the edges. Tuck any excess inside the pie pan. One more thing to do: cut a small round hole in the middle of the pie, to allow steam to escape.
Put in oven. Bake 20-30 minutes, or until the pastry becomes puffed and golden. Let sit for 5 to 10 minutes to cool before serving.
Well, there you go – my tried-and-true answer to turkey leftovers. (It works GREAT with a pre-cooked chicken, too!) I don’t do the candied yams; this year, I didn’t make cranberry sauce, as I’m usually the only one who eats it. I’ll probably do a quick casserole with leftover stuffing, chopped turkey, and leftover gravy all mixed together and topped with biscuits (an easier pot pie, I guess…). If I have any turkey left over, that is!
As always, sending lots of love from my kitchen to yours. Now…who wants to go for a nice slow jog around the block?
Thanks for joining me – and remember, drink responsibly!
by Christine | Cooking, Wine Friday
A couple weekends ago, Hubby texted me from his movie shoot. “I’m freezing. It’s been sleeting/snowing/raining/snowing/hailing/snowing and I’ve been outside all day…I’ll be home in an hour, give me something HOT and ALCOHOLIC to drink.”
 I had a couple open bottles of red wine in the fridge. Without bothering to look up a recipe, I tossed them into a pan, threw in a cinnamon stick, a few cloves, and a cup of water (because I remembered that, somewhere in the back of my brain). After it heated (NOT boiled), I tasted it – bitter. So I added some brown sugar – about 3 tablespoons’ worth, I believe.
It did the trick. He came home only half frozen – a hot bath and a mug of mulled wine unfroze him the rest of the way.
I got to thinking, though. Who “invented” mulled wine? Why? What’s supposed to go in it, and what type of wine should you use? All the sites I found on the internet seemed to crib off each other. To distill it for you, basically mulled wine has been around as long as wine has been around. It warmed people up in winter (and some people said it was to make bad wine taste better – a winter version of Sangria, I suppose) as well as gave them something “healthy” to drink (because water – well, it wasn’t very clean “way back when”). It can be found in almost every European country, and is often called “boiled” or “burned” wine. Of course, you don’t want to boil or burn the wine! (Boiling burns off all the alcohol.)
Ingredients
First off, start with a hearty red wine. Cabernet Sauvignon or Zinfandel will work nicely. If you’re making enough for a crowd, use two bottles – pour into a non-reactive pan (or hey, use that crock pot you got for your wedding and has that thick layer of dust on it – make sure to clean it first). If just for two to four people, use one bottle. DON’T use the cheapest wine you can find (although if you must, go ahead…); but likewise, don’t waste an expensive bottle. Anything that you like the taste of non-heated should be fine.
Next, add the spices. This will totally depend on your tastebuds. I like two cinnamon sticks – hubby likes only one. I generally put six to a dozen whole cloves, and if I had allspice, I’d toss that in, too. You can add ginger – either 1/2 teaspoon grated, or a small slice; or you could put in 1/4 teaspoon powdered ginger (but fresh is much better). I’ve seen recipes that include cardamom pods, star anise, even bay leaves. Experiment!
Your next addition should be another liquid. Amounts kind of depend. You can add up to a cup of plain water, a cup of fresh squeezed orange juice, or a cup of apple cider; many recipes call for adding 4 ounces of brandy (some say cherry brandy). I started with water; next time, I think I’ll add brandy AND some OJ.
Then comes the sweetener. The amount depends on how much wine you start with. So you can add anything from 1/2 cup of white or brown sugar to 1 and 1/4 cup of honey; start on the stingy side, and taste as you go. Add more if you need to. My guess is if you’re using Agave syrup or Stevia for your sweetener, you can use them here, too; just be VERY stingy with your amounts until it’s where you want it.
Lastly comes the fruit. Whether or not you’ve already used orange or apple juice, you might want to add strips of orange zest or lemon zest; thin slices of orange and lemon; either in the pot, or in the bottom of the mug.
Let everything sit on low; either on the back of your stove, or in your crockpot. As the day goes on, the spices and the fruit really open up into the wine, and turn it into something magical. Plus, it leaves your house smelling really festive.
Recipe Heaven! Here are a couple of recipes, for those of you who don’t want to guess at amounts.
From Cooks.com:
2 bottles Cabernet Sauvignon, 1 1/4 cups honey, 4 cinnamon sticks, 1/2 cup sugar, 8 pieces cloves, 1 qt. strained fresh orange juice.
Cook to nearly boiling, then add 8 ounces brandy. Cut ingredients in half to serve six.
From Just Hungry:
1 bottle inexpensive yet tasty dry red wine, 2/3 cup of raw cane sugar or white sugar, or non-artificial sweetener of your choice, juice and peel of one small lemon, 2 cardamom pods, 4 cloves, 2 bay leaves, 2 cinnamon sticks.
Put everything in a heavy-bottomed pan. Sitr to melt the sugar. Heat the mixture over low heat, and leave for about an hour; it should never boil, just sort of seethe. Serve in small mugs (straining out the peel and spices), with optional shot of brandy, kirsch or other liquor.
Of course, if you Google mulled wine, you’ll get a ton of recipes – but you have the basics with what I’ve given you here. Play around, and do share if you come up with a new, tasty mulled wine treat!
From my house to yours, I hope you have a very Happy Thanksgiving. Come on back the day after Turkey Day, as I’m participating in a Black Friday Blog Hop!
~ Until the next time, cheers – and remember to drink responsibly! ~
Demon Soul is available for the Kindle and the Nook! Have you read it yet?

by Christine | Cooking
The lovely author Ashley Cockerill has asked me about my Yummalicious Hollandaise Sauce. I really have to add – it should be called Easy Peasy Yummalicious Hollandaise Sauce. That, as you might imagine, got me to thinking and salivating about weekend breakfast.
Yesterday I stumbled upon another fantastic recipe (thanks to Angela James), and now I have two totally different breakfasts for you to make some super-special weekend. (Also good for relaxing holiday breakfasts, if you’re not the one in charge of the family dinner.)
 BREAKFAST #1: Eggs Benedict I love eggs Benedict, mainly for the Hollandaise sauce. Over the years I have strayed from the narrow cook-book definition of eggs benedict – I don’t always use English muffins, I rarely use Canadian bacon, I don’t poach the eggs (don’t get me started about poached eggs!); so how can it be remotely considered eggs Benedict? It’s all about the Hollandaise Sauce, baby. Let me define it before going further:
As eHow.com puts it: Hollandaise sauce is “A hot, emulsified sauce made from egg, butter and lemon juice. It’s one of the five “mother” sauces of French cooking.” (And, apparently, has been around for four hundred years or so. Woof.)
My mom, not being a gourmet cook (but feeding us well and tastily for many years), never made Hollandaise sauce. It wasn’t until I married a man with a microwave that I learned to love it. Since I married that man, we’ve replaced the microwave three times (kept the man!) and the book I learned this recipe from is long gone, but here it is:
Ingredients:
¼ cup butter (or margarine), ¼ cup light cream, 2 egg yolks, beaten, 1 Tablespoon fresh lemon juice, ¼ teaspoon salt, ½ teaspoon dry mustard
Put your butter in a two-cup container and microwave for 20-30 seconds, until melted. Add remaining ingredients; mix well. Cook in the microwave, uncovered, for one minute until thick – stir with a fork every 15 to 20 seconds. And…voila! Makes 2/3 cup sauce, more or less. Perfect!
Note: I have never used margarine in this recipe. I’ve varied the light cream from everything to heavy whipping cream, to half and half, depending on what I had in the fridge or what I could afford. For the lemon, MEYER lemons (preferrably home grown) work beautifully in this recipe – but if you absolutely have to use bottled lemon juice, go ahead. Oh, and always save your extra egg whites in the fridge for breakfast the next morning. And do NOT leave out the dry mustard! Wet mustard will not work, sorry.
I have never made this any other way than in the microwave – but when I hear people tell stories about it, there’s usually tears involved. I’ve never cried about the way this recipe turned out.
Poaching eggs: I refuse. (What are restaurants for, anyway?) After many failures and partial eggs, as I was making my breakfast one morning the lightbulb went off in my head – I was making them the way I had been taught by my father when I was a very young ballet dancer – technically “poaching” the eggs without the headache. Let me tell you how.
Hot pan, butter sizzling, crack two eggs in. Let them sizzle for a bit, then add about 3 tablespoons of water, and put the lid on the eggs. DO NOT LEAVE THE KITCHEN OR YOU’LL HAVE RUBBER EGGS. Cook on medium, but check the eggs after a minute. Once the egg whites are set, the egg is done! If you want the yolk hard and not runny, take off the heat, leave the cover on and make the toast you forgot to make earlier, and you’ll have a hard yolk.
So how do I make my eggs Benedict? Either English muffin or a croissant, split in half and toasted. Hollandaise sauce, made in microwave. Bacon, likewise made in microwave (lots less grease to clean up!). If using sandwich ham, I heat it in the same pan as the eggs. If I’m really spiffy and using Canadian bacon, then I gently warm it in the microwave. Or sometimes I’ll use cooked asparagus, but that’s another post. Once your bread and meat are done, plop the egg on top, drizzle the Hollandaise sauce, sprinkle lightly if you wish with Paprika, and serve with a cup of fruit, a cut up apple or a quartered tomato fresh from the garden, plus the perfect cup of coffee or tea to round out your meal. Prepare to go into a food coma after eating.
By the way, I highly recommend ONE egg per person, and loading up on the fruit and fresh veggies. You can always put the asparagus on the side and drizzle Hollandaise on top…
Best Weekend Breakfast #2: This is perfect for that rush rush, gotta get breakfast out of the way before the holiday begins. It’s also great for a slow weekend, a lazy morning, a cup of coffee and the Sunday Times. It’s called the Maple-Bacon Biscuit Bake. I made it early this morning – my home still smells of bacon 12 hours later.
It’s heaven in a biscuit. Kind of strange, in that you only bake it for ten minutes (okay, at 475 F, but still…) and then leave it in the oven for another ten to 15 minutes with the heat off…but let me tell you, it was love at first bite. Bacon, maple syrup, brown sugar, butter, and a fabulous biscuit recipe (that alone is a HUGE keeper!). What’s not to love? Go to the link above and get the recipe – Angela James put it on Facebook yesterday, which is how I found it (and got all fangirl and STUPID because it was ANGELA JAMES putting it up – sigh!). My Hubby, my two Young Men, and a teen who had stayed the night all declared these biscuits to be the Best. Breakfast. Biscuits. Ever. And they’re easy. You can either use real milk or buttermilk. My guess is, if all you have is half and half that would work just as well.
Oh, and don’t freak when you see Bakewell Cream in the ingredients list. There are directions to use baking powder and omit the baking soda if you don’t have Bakewell Cream…though I’m thinking I need to try it out, and might just place an order for it soon.
So Ashley, there you have it – not only the Hollandaise Sauce to DIE for (terrific on Steak Diane…), but a wonderful breakfast biscuit, too. Enjoy!
P.S. – I know, it’s Monday. But hey, the weekend will be here before we know it – and now you’ve got time to plan! Cheers!
~ ~ ~
Demon Soul is available for the Kindle and the Nook! Get your copy today!
